
Hi Everyone & Merry Christmas.
Ive had a very busy Month. Last month I was getting our bedroom and En-suite refurbished which is now virtually finished apart from a bathroom door, but hey! Who needs privacy anyway? I have daughters who think they can burst into the bathroom whilst I’m sitting in the bath, now they just have 1 less door to come through 🙂

A few pictures of before and after. I made a black, white and grey tiger stripe soap a few months ago, which matched perfectly into the color scheme of my bathroom.


I slept on a mattress on my dining room floor for 4 weeks so everything coming together was great. I finally had a bed and new bathroom to enjoy. I could begin to make soap again…
This month, it is tiger stripes technique. This pour was one of the first techniques I tried when I started making soap, just over 2 years ago.
I decided to try a modified version. I used the wall pour technique similar to a skinny shimmy.
I went with the same colours as the striped tile of the bathroom, black, white and grey again. I used mad oils micas for the white and grey, the black is pigment oxide.

For fragrance I used Lemon Peel Zest from Scent Perfique which is a lovely fresh, zesty scent but best of all it behaves itself. Lots of working time to pour my layers.
I used squirt bottles to get a very fine line down the side of the mould. I alternated black, white then grey with the mould tipped to the side and passed on one side 9 times, turned the mould around, tipped to the side and passed 9 times again. I carried on doing this until the mould was practically full. My soap stayed very fluid throughout. For the top, I poured lines of soap and swirled a little with a skewer.
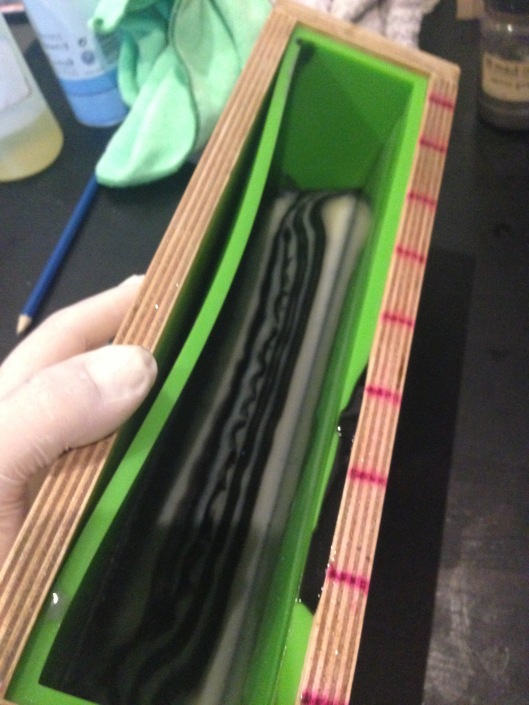


With my slow moving recipe, I always have to pop it in the oven for an hour and then leave alone overnight to work its magic.
The following day only 12 hours after it was ready to cut. This is a pic just after unmoulding which you can see the fine lines at the side.

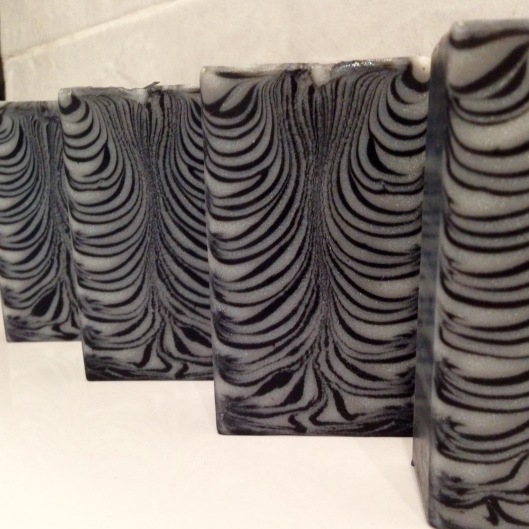
Here are the cut pics.


I had a little bit of soap batter left at the end so I made some cute little hearts which I can give away as samples.

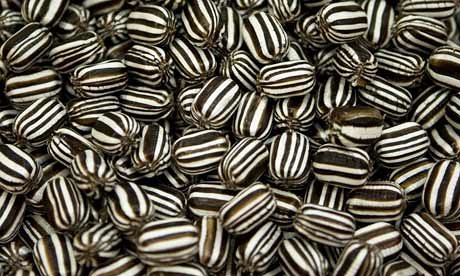
Once I had cut my soaps, they reminded me of little mint humbugs stacked on top of one another, that is why it is called BAH Humbug, not because I don’t like Christmas lol.
Thanks to Amy again for hosting these great challenges. Sometimes they are hard, sometimes easy, but very enjoyable.
Hope you all have a great Christmas & New Year and hope to see you all next year.
As Always, Love from Spain!
Carolyn x

My first time to see mint humbugs!! They look delicious – what a fantastic inspiration for your soap – as well as your beautiful spa bathroom!! Wow!! Your lines are SOOOO thin! Really pretty design!
LikeLiked by 1 person
Thanks so much Amy! I wondered if you American girls would get my humbug soap lol. I get inspiration from the strangest things☺️ Great going back to the tiger stripe though💕
LikeLike
Beautifully done Carolyn! Loving the refurb too 😍
LikeLiked by 1 person
Thanks so much Vicki! I’m so glad the refurb is finished (nearly). Hope yours is coming along nicely and can’t wait to see pics😊💕
LikeLike
This is super elegant, Carolyn. The name is hilarious, and I did have to wonder if you didn’t like Christmas, but then it all became very clear when I saw the photo of the humbugs LOL!
LikeLike
Thanks so much Lisa💕 I really do love Christmas so that is why I had to explain the name☺️ The soap just reminded me of the little mints lol x
LikeLike
Lovely soap, Carolyn and love you’re inspiration ! Your lines are so thin and beautiful.!!!
LikeLike
Thankyou Rhonda. It took a while to pour but I knew I wanted the really fine lines so it was worth the extra time it took. Thanks so much for your lovely comment💕
LikeLike
Carolyn: I love this soap! The name is great – never heard of those mints before (guess I will have to go to Spain!) How talented and inspirational of you to come up with a new version of the tiger stripe…now I have to try that! Sly
LikeLike
Thanks so much Sylvia! I think humbugs are a British sweet. I thought I had better explain the name because everyone might not know where I was coming from with it lol. Oh please do try the pour, I would love to see your take on it x
LikeLike
I love this design so much! The stripes meeting in the middle and flowing up is mesmerizing!!
LikeLike
Thanks so much Natalie! When I tried the skinny shimmy I found it quite hard but doing a tiger pour in that technique I thought might give a cool effect. I was pleasantly surprised when I cut it☺️
LikeLike
Such fine lines ,a very sleek exotic soap . Beautiful! Carolyn
LikeLike
Thankyou Judy for your lovely comment. I just wanted to try something a bit different to the usual pour💕
LikeLike
“Fantastic” – is the word that came to my mind when I saw this. Loved your technique and execution ! Its truly a masterpiece. I am going to try to get this design soon 🙂
LikeLike
Thankyou so much Priya! It’s always hard trying to think of new ways to pour soap. I thought it would be cool to combine the 2 techniques to see what could be done. I would love to see your soap when you have tried😊💕
LikeLike
This is such a beautiful submission! Lovely work 🙂
LikeLike
Thankyou so much Belinda! 😊💕
LikeLike
I am sure you are glad to have the renovation complete- my daughter doesn’t believe in doors either-lol! Your soap is amazing- how creative to incorporate the Shimmy pour with it!!! Nicely done!
LikeLike
Thanks so much Sara! Yes, I’m so glad it’s finished. Our door gets fitted tomorrow so privacy can once again be resumed☺️💕
LikeLike
So beautiful and delicate, Carolyn! The pouring technique is really unique and creative. They look like whispy feathers to me! I am so envious and in love with your bathroom too. I especially love the tiles and that fabulous tub. So amazing. And your soap – amazing as well! Suddenly, I feel this overwhelming need to find some humbugs! It’s amazing the things we learn from these challenges!
LikeLike
Thankyou so much Debi! I’m a little bit in love with my new bathroom too. When you wait for something to be finished so long, it was lovely to finally have a bath☺️ Thanks again for your lovely comment on my soap, I just wanted to try something a bit different to see how it turned out💕
LikeLike
Beautiful soap, me encanta como te quedo, mucha suerte and Merry Christmas, lo mejor para el 2017 🙂
LikeLike
Muchas Gracias Alexandra! Feliz Navidad a tu tambien. 💕
LikeLike
Another beautiful creation!! I like that it looks like humbugs! Great job 🙂 …and also your bathroom renovation is just lovely 😉
LikeLike
Thankyou Helene! Strange how soaps remind you of things isn’t it and this just reminded me so much of humbugs☺️💕
LikeLike
Wow – this is beautiful soap you’ve created! So interesting that it stayed so symmetrical. I love it – thanks for sharing your process.
LikeLike
Thankyou so much Marisa! Glad you like it☺️💕
LikeLike
Beautiful! I love the colors, it looks like either Zebra, or Siberian tiger ☺❤
LikeLike
Thanks so much Eva. My daughter said it reminded her of zebra stripes too☺️💕
LikeLike
I love this! Simple color scheme with amazing results.
LikeLike
Thankyou Keely. I always think a lot can be done with just black, white and a touch of grey. I do love bright colours but wanted to try this pour with simple colours. I will try it one day with brights☺️💕
LikeLike
Beautiful lines and perfect name for your soap… Such a lovely work.. All the best!
LikeLike
Thankyou so much for your lovely comment☺️💕
LikeLike
Amazing! this must have been a real lot of hard work! And i love humbugs 🙂
LikeLike
Thankyou so much Aruna! It did take a little while to pour but I knew I wanted very fine lines so it was worth the time. Humbugs are nice aren’t they?☺️💕
LikeLike
This is an absolutely gorgeous bar with so much appeal! well done and great vision 🙂
LikeLike
Thankyou so much! I just wanted to try the tiger stripe slightly different to see how it worked out☺️💕
LikeLike
Out of all of the stunning soaps that were made during this month’s challenge club, this one is my absolute favorite! It is absolutely stunning and has such a classy abstract art look that I personally love! Thank you for sharing your art and how you made it. Great job!
LikeLike
Thankyou so much for your lovely comment. That is so nice of you to say. I’m happy to share how I mad it so we can all have a go at different techniques. It’s always hard finding new pours but combining 2 ways makes things interesting. Thanks again☺️💕
LikeLike
Such a great technique! I love it. I went down memory lane as soon as I saw the humbugs. My school friends and I would have puffy cheeks during recess as we tried to see whose humbug took the longest to dissolve 🙂
LikeLiked by 1 person
Such a lovely memory Savie. I also remember humbugs from my youth ☺️
Thankyou so much for your lovely comment💕
LikeLike
Your Bah Humbug soap has a great design! I tried to do it but don’t think I understood the instructions (mine wasn’t anything close). When you tip the mold, which side are you pouring the soap on? (I’m assuming your are running a line of soap down the entire length of a long side and not sure if it’s the higher or lower side). If you have any other tips, that would be great! Thanks for sharing this online!
LikeLiked by 1 person
Hi Camille, I poured this soap at very light trace.I also popped it in the oven to cpop at 65 degrees c for an hour. You are correct in thinking that you pour a line of soap from one end to the other and repeat for 9 passes, tilt the mould the other way and pass 9 times again, alternating your colours and always pour on the lowest side. Hope that helps, if you have any other questions just ask and good luck with your testing!
LikeLike
Great, I will try again. I appreciate the advice!
LikeLike